Wednesday, 29 January 2014

MVC 4 - Dynamic Output

Leave a Comment
The whole point of a Web application platform is to construct and display dynamic output. In MVC, it is the controller’s job to construct some data and pass it to the view, which is responsible for rendering it to HTML.

One way to pass data from the controller to the view is by using the ViewBag object, which is a
member of the Controller base class. ViewBag is a dynamic object to which you can assign arbitrary properties, making those values available in whatever view is subsequently rendered. Example below
demonstrates passing some simple dynamic data in this way in the HomeController.cs file.

HomeController.cs

 
 public class HomeController : Controller
    {
        //
        // GET: /Home/

        public ViewResult Index()
        {
            int hour = DateTime.Now.Hour;
            ViewBag.Greeting = hour < 12 ? "Good Morning" : "Good Afternoon";
            return View();
        }

    }

Index.cshtml

 
@{
Layout = null;
}

<!DOCTYPE html>
<html>
<head>
<meta name="viewport" content="width=device-width" />
<title>Index</title>
</head>
<body>
<div>
@ViewBag.Greeting World (from the view)
</div>
</body>
</html>


Output


By
NOTE : – If You have Found this post Helpful, I will appreciate if you can Share it on Facebook, Twitter and Other Social Media Sites. Thanks =)
Read More...

MVC 4 - Rendering web Pages

Leave a Comment
The output from the previous post wasn’t HTML—it was just the string "Hello World, This is my first MVC Application". To produce an HTML response to a browser request, we need to create a view.

Creating And Rendering a View

  1. Modify the Controller to render a View (please refer the previous post before you do this).
  2.  
            public ViewResult Index()
            {
                return View();
            }
    
    
  3. Right click at word View() and choose Add View
  4. Leave the devault value and click Add button
  5. Congratulation, now you have successfully created new view which will be rendered as html when the root / or  /Home or /Home/Index url hit
Note : The .cshtml file extension denotes a C# view that will be processed by Razor.

Now copy this HTML code on the Index.cshtml file.
@{
    ViewBag.Title = "Index";
}

<!DOCTYPE html>
<html>
<head>
<meta name="viewport" content="width=device-width" />
<title>Index</title>
</head>
<body>
<div>
Hello World (This is render from the view).
</div>
</body>
</html>


By
NOTE : – If You have Found this post Helpful, I will appreciate if you can Share it on Facebook, Twitter and Other Social Media Sites. Thanks =)
Read More...

Creating Your First MVC 4 Application

Leave a Comment
In this tutorial i will show the example on MVC 4.

Follow this step to create new MVC Application on Microsoft Visual Studio 2010.

Creating MVC 4 Project

  1. File >> New Project
  2. Choose ASP.NET MVC4 Web Application. (If you dont have MVC 4, Install it here)
  3. On Project Template, choose Empty if you want to start from zero or choose Internet Application to start developement with default template.
  4. Choose View engine Razor.
  5. Click OK button
  6. Now you have create one project with MVC4 Solution

 Adding First Controller

  1. Right click on the Controller folder under Solution Explorer Menu.
  2. Choose Add >> Controller
  3. Rename Controller Name to HomeController
  4. Since this is empty project, so under Scaffolding Options Template choose Empty MVC Controller
  5. Change The default ActionResult Index() like this
  6.  
            public string Index()
            {
                return "Hello World, This is my first MVC Application";
            }
    
    
  7. Run the project, You should see the output on the browser like image below.
  8.  

Understanding Route

As well as models, views, and controllers, MVC applications use the ASP.NET routing system, which
decides how URLs map to particular controllers and actions. When Visual Studio creates the MVC project, it adds some default routes to get us started. You can request any of the following URLs, and they will be directed to the Index action on the HomeController:

  • /
  • /Home
  • /Home.Index

So, when a browser requests http://yoursite/ or http://yoursite/Home, it gets back the output from
HomeController’s Index method. You can try this yourself by changing the URL in the browser. At the moment, it will be http://localhost:23859/, except that the port part may be different. If you append /Home or /Home/Index to the URL and hit return, you will see the same Hello World result from the MVC application.

This is a good example of benefiting from following MVC conventions. In this case, the convention is that we will have a controller called HomeController and that it will be the starting point for our MVC application. The default routes that Visual Studio creates for a new project assume that we will follow this convention. And since we did follow the convention, we got support for the URLs in the preceding list.

If we had not followed the convention, we would need to modify the routes to point to whatever
controller we had created instead. For this simple example, the default configuration is all we need.

Note : You can see and edit your routing configuration by opening the Global.asax.cs file

By
NOTE : – If You have Found this post Helpful, I will appreciate if you can Share it on Facebook, Twitter and Other Social Media Sites. Thanks =)
Read More...

Decimal Manipulation in C#

Leave a Comment
This post will  show manipulation on the Data Type Decimal.

  //This is the hard code value for decimal
  //without suffic m or M, the compiler thread the object as a double hence will cause error
  decimal price = 10.1654M;

  //Convert decimal to double
  double priceInDouble = Convert.ToDouble(price); //output : 10.1654
  priceInDouble = (double)price;//output : 10.1654

  //convert to double with 2 decimal point,         
  priceInDouble = Math.Round((double)price, 2); // output : 10.17

  //convert back to decimal
  price = Convert.ToDecimal(priceInDouble);//output : 10.17
  price = (decimal)priceInDouble;//output : 10.17

  //convert decimal to currency. The currency format will depend on the region,
  //like myself in malaysia compiler will automatically give "RM" as a currency format
  string currency = String.Format("Order Total: {0:C}", price); //output :RM10.17
  currency = String.Format("Order Total: {0:C2}", price); //output :RM10.17 ,2 decimal point
  currency = String.Format("Order Total: {0:C3}", price); //output :RM10.170 , 3 decimal point
  currency = String.Format("Order Total: {0:C4}", price); //output :RM10.1700 ,4 decimal point


By
NOTE : – If You have Found this post Helpful, I will appreciate if you can Share it on Facebook, Twitter and Other Social Media Sites. Thanks =)
Read More...

Tuesday, 28 January 2014

How to send email in ASP.NET- C# example

Leave a Comment
This is example how to send email from asp,net web application. Refer this post if you want to send email in java code .

This example will use google smtp email server.

The aspx Page

<asp:Content ID="Content2" ContentPlaceHolderID="MainContent" runat="server">
    <asp:Label ID="LErrorMessage" runat="server" ></asp:Label>
    <asp:Button ID="Button1" runat="server" Text="Send Email" OnClick="Button1_Click" />
</asp:Content>

The Code Behind

 protected void Page_Load(object sender, EventArgs e)
        {

        }

        protected void Button1_Click(object sender, EventArgs e)
        {
           
            string emailContent = "This mail is created and send through the c# code,"
                    + "\n\n if you are developers, visit http://www.developersnote.com!", 
                    subject = "Developersnote update - Mail Send Using ASP.NET";
            string EmailFrom = "developersnote dot com",
                   EmailFromAddress = "developersnote.com@gmail.com";

            try
            {
                MailMessage mMsg = new MailMessage();
               
                SmtpClient smtpClient = new SmtpClient("smtp.gmail.com", 587);
                smtpClient.EnableSsl = true;
                smtpClient.Credentials = new System.Net.NetworkCredential("your email address", "email password");
                mMsg.From = new MailAddress(EmailFromAddress, EmailFrom);
                mMsg.To.Add("developersnote@dev.com");
                mMsg.Subject = subject;
                mMsg.Body = emailContent;
                mMsg.IsBodyHtml = true;
                smtpClient.Send(mMsg);
               
            }
            catch(Exception ex)
            {
                LErrorMessage.Text = ex.Message;
            }
        }
    }

Sample receive email


By
NOTE : – If You have Found this post Helpful, I will appreciate if you can Share it on Facebook, Twitter and Other Social Media Sites. Thanks =)
Read More...

How to send email in java - example

Leave a Comment
This is a example code to send email in java. This example will use 3rd party library JavaMail  .

The Code Example

import java.util.Properties;

import javax.mail.Message;
import javax.mail.MessagingException;
import javax.mail.PasswordAuthentication;
import javax.mail.Session;
import javax.mail.Transport;
import javax.mail.internet.InternetAddress;
import javax.mail.internet.MimeMessage;

/**
 *
 * @author zulkamal
 */
public class sendEmail {

    public static void main(String[] args) {
        final String username = "yourgmailaddress@gmail.com";
        final String password = "your password gmail";

        Properties props = new Properties();
        props.put("mail.smtp.auth", "true");
        props.put("mail.smtp.starttls.enable", "true");
        props.put("mail.smtp.host", "smtp.gmail.com");
        props.put("mail.smtp.port", "587");

        Session session = Session.getInstance(props,
                new javax.mail.Authenticator() {
                    protected PasswordAuthentication getPasswordAuthentication() {
                        return new PasswordAuthentication(username, password);
                    }
                });

        try {

            Message message = new MimeMessage(session);
            message.setFrom(new InternetAddress("yourgmailaddress@gmail.com"));
            message.setRecipients(Message.RecipientType.TO,
                    InternetAddress.parse("recipient_email@gmail.com"));
            message.setSubject("Mail Send Using JAVA");
            message.setText("This mail is created and send through the java code,"
                    + "\n\n if you are developers, visit http://www.developersnote.com!");

            Transport.send(message);

            System.out.println("Done");

        } catch (MessagingException e) {
            throw new RuntimeException(e);
        }
    }
}


Example receive email


By
NOTE : – If You have Found this post Helpful, I will appreciate if you can Share it on Facebook, Twitter and Other Social Media Sites. Thanks =)
Read More...

How to create XML File In Java

Leave a Comment
This is a example of creating XML file in java application.

The Main Class Code

import java.io.File;
import java.util.ArrayList;

import javax.xml.parsers.DocumentBuilder;
import javax.xml.parsers.DocumentBuilderFactory;
import javax.xml.parsers.ParserConfigurationException;
import javax.xml.transform.Transformer;
import javax.xml.transform.TransformerConfigurationException;
import javax.xml.transform.TransformerException;
import javax.xml.transform.TransformerFactory;
import javax.xml.transform.dom.DOMSource;
import javax.xml.transform.stream.StreamResult;

import org.w3c.dom.Attr;
import org.w3c.dom.Document;
import org.w3c.dom.Element;


public class CreateXml {

    public static void main(String[] args) throws TransformerException {
        ArrayList<String> arrayOne = new ArrayList<String>();
        ArrayList<String> arrayTwo = new ArrayList<String>();
        ArrayList<String> arrayThree = new ArrayList<String>();
        
        for(int i = 0; i < 20; i++){
            arrayOne.add("Element : " + Integer.toString(i));
            arrayTwo.add("Element : " + Integer.toString(i));
            arrayThree.add("Element : " + Integer.toString(i));
        }        

        DocumentBuilderFactory docFactory = DocumentBuilderFactory.newInstance();
        DocumentBuilder docBuilder;
        try {
            docBuilder = docFactory.newDocumentBuilder();

            // root elements
            Document doc = docBuilder.newDocument();
            Element rootElement = doc.createElement("Root");
            doc.appendChild(rootElement);

            for (int i = 0; i < arrayOne.size(); i++) {

                // elements
                Element staff = doc.createElement("Value");
                rootElement.appendChild(staff);

                // set attribute to element
                Attr attr = doc.createAttribute("id");
                attr.setValue(arrayThree.get(i).toString());
                staff.setAttributeNode(attr);

                Element tag1 = doc.createElement("tag1");
                tag1.appendChild(doc.createTextNode(arrayOne.get(i).toString()));
                staff.appendChild(tag1);

                Element tag2 = doc.createElement("tag2");
                tag2.appendChild(doc.createTextNode(arrayTwo.get(i).toString()));
                staff.appendChild(tag2);

            }

            TransformerFactory transformerFactory = TransformerFactory.newInstance();
            Transformer transformer;
            try {
                transformer = transformerFactory.newTransformer();

                DOMSource source = new DOMSource(doc);
                StreamResult result = new StreamResult(new File("d:\\developersnoteXMLFile.xml"));

                // Output to console for testing
                // StreamResult result = new StreamResult(System.out);
                transformer.transform(source, result);

                System.out.println("File saved!");
            } catch (TransformerConfigurationException e) {
                // TODO Auto-generated catch block
                e.printStackTrace();
            }
        } catch (ParserConfigurationException e1) {
            // TODO Auto-generated catch block
            e1.printStackTrace();
        }
    }
}


Sample Output

<?xml version="1.0" encoding="UTF-8" standalone="no"?>
<Root>
  <Value id="Element : 0">
    <tag1>Element : 0</tag1>
    <tag2>Element : 0</tag2>
  </Value>
  <Value id="Element : 1">
    <tag1>Element : 1</tag1>
    <tag2>Element : 1</tag2>
  </Value>
  <Value id="Element : 2">
    <tag1>Element : 2</tag1>
    <tag2>Element : 2</tag2>
  </Value>
  <Value id="Element : 3">
    <tag1>Element : 3</tag1>
    <tag2>Element : 3</tag2>
  </Value>
  <Value id="Element : 4">
    <tag1>Element : 4</tag1>
    <tag2>Element : 4</tag2>
  </Value>
  <Value id="Element : 5">
    <tag1>Element : 5</tag1>
    <tag2>Element : 5</tag2>
  </Value>
  <Value id="Element : 6">
    <tag1>Element : 6</tag1>
    <tag2>Element : 6</tag2>
  </Value>
  <Value id="Element : 7">
    <tag1>Element : 7</tag1>
    <tag2>Element : 7</tag2>
  </Value>
  <Value id="Element : 8">
    <tag1>Element : 8</tag1>
    <tag2>Element : 8</tag2>
  </Value>
  <Value id="Element : 9">
    <tag1>Element : 9</tag1>
    <tag2>Element : 9</tag2>
  </Value>
  <Value id="Element : 10">
    <tag1>Element : 10</tag1>
    <tag2>Element : 10</tag2>
  </Value>
  <Value id="Element : 11">
    <tag1>Element : 11</tag1>
    <tag2>Element : 11</tag2>
  </Value>
  <Value id="Element : 12">
    <tag1>Element : 12</tag1>
    <tag2>Element : 12</tag2>
  </Value>
  <Value id="Element : 13">
    <tag1>Element : 13</tag1>
    <tag2>Element : 13</tag2>
  </Value>
  <Value id="Element : 14">
    <tag1>Element : 14</tag1>
    <tag2>Element : 14</tag2>
  </Value>
  <Value id="Element : 15">
    <tag1>Element : 15</tag1>
    <tag2>Element : 15</tag2>
  </Value>
  <Value id="Element : 16">
    <tag1>Element : 16</tag1>
    <tag2>Element : 16</tag2>
  </Value>
  <Value id="Element : 17">
    <tag1>Element : 17</tag1>
    <tag2>Element : 17</tag2>
  </Value>
  <Value id="Element : 18">
    <tag1>Element : 18</tag1>
    <tag2>Element : 18</tag2>
  </Value>
  <Value id="Element : 19">
    <tag1>Element : 19</tag1>
    <tag2>Element : 19</tag2>
  </Value>
</Root>


By
NOTE : – If You have Found this post Helpful, I will appreciate if you can Share it on Facebook, Twitter and Other Social Media Sites. Thanks =)
Read More...

The ASP.NET developer checklist

Leave a Comment
The post is just a checklist for developers when they a re building a website/web application/ portal .
The list are the common step that need to execute before it is actually done.

The developer checklist

  1. Fix broken link
  2. Spelling and grammar
  3. Check website in all browser
  4. Custom 404
  5. Traffic analysis (Google analytics)
  6. Favicon
  7. Optimize Image 
  8. Optimize HTTP Header
  9. Use friendly URL
  10. HTML Validation
  11. CSS Validation
  12. Secure Connection (optional)
  13. Add Search feature (optional)
  14. Cache static page
  15. SEO Optimze (robot.txt , XML sitemap)


By
NOTE : – If You have Found this post Helpful, I will appreciate if you can Share it on Facebook, Twitter and Other Social Media Sites. Thanks =)
Read More...

Wednesday, 22 January 2014

Top Programming Langguage 2014

Leave a Comment
The technical sector is booming. If you are working with smartphone or or a computer tablet etc, you should probably notice about this.

As a result, coding skills are in high demand, with programming jobs paying significantly more than the average position. Even beyond the technical world, an understanding of at least one programming language makes an impressive addition to any resume.

1. Java


Java is a class-based, object-oriented programming language developed by Sun Microsystems in the 1990s. It's one of the most in-demand programming languages, a standard for enterprise software, web-based content, games and mobile apps, as well as the Android operating system. Java is designed to work across multiple software platforms, meaning a program written on Mac OS X, for example, could also run on Windows. 

2. C Langguage

A general-purpose, imperative programming language developed in the early '70s, C is the oldest and most widely used language, providing the building blocks for other popular languages, such as C#, Java, JavaScript and Python. C is mostly used for implementing operating systems and embedded applications.

Because it provides the foundation for many other languages, it is advisable to learn C (and C++) before moving on to others.

3. C++ 

C++ is an intermediate-level language with object-oriented programming features, originally designed to enhance the C language. C++ powers major software like Firefox, Winamp and Adobe programs. It's used to develop systems software, application software, high-performance server and client applications and video games.

4. C#

Pronounced "C-sharp," C# is a multi-paradigm language developed by Microsoft as part of its .NET initiative. Combining principles from C and C++, C# is a general-purpose language used to develop software for Microsoft and Windows platforms.

5. Objective -C

Objective-C is a general-purpose, object-oriented programming language used by the Apple operating system. It powers Apple's OS X and iOS, as well as its APIs, and can be used to create iPhone apps, which has generated a huge demand for this once-outmoded programming language.

6. PHP

 PHP (Hypertext Processor) is a free, server-side scripting language designed for dynamic websites and app development. It can be directly embedded into an HTML source document rather than an external file, which has made it a popular programming language for web developers. PHP powers more than 200 million websites, including Wordpress, Digg and Facebook.

7. Python

Python is a high-level, server-side scripting language for websites and mobile apps. It's considered a fairly easy language for beginners due to its readability and compact syntax, meaning developers can use fewer lines of code to express a concept than they would in other languages. It powers the web apps for Instagram, Pinterest and Rdio through its associated web framework, Django, and is used by Google, Yahoo! and NASA.

8. Ruby

A dynamic, object-oriented scripting language for developing websites and mobile apps, Ruby was designed to be simple and easy to write. It powers the Ruby on Rails (or Rails) framework, which is used on Scribd, GitHub, Groupon and Shopify. Like Python, Ruby is considered a fairly user-friendly language for beginners.

9. Javascript

JavaScript is a client and server-side scripting language developed by Netscape that derives much of its syntax from C. It can be used across multiple web browsers and is considered essential for developing interactive or animated web functions. It is also used in game development and writing desktop applications. JavaScript interpreters are embedded in Google's Chrome extensions, Apple's Safari extensions, Adobe Acrobat and Reader, and Adobe's Creative Suite.

10. SQL / T-SQL

Structured Query Language (SQL) is a special-purpose language for managing data in relational database management systems. It is most commonly used for its "Query" function, which searches informational databases. SQL was standardized by the American National Standards Institute (ANSI) and the International Organization for Standardization (ISO) in the 1980s.


By
NOTE : – If You have Found this post Helpful, I will appreciate if you can Share it on Facebook, Twitter and Other Social Media Sites. Thanks =)
Read More...

Tuesday, 21 January 2014

Jquery - Basic function for beginner

Leave a Comment
This is a jQuery basic fucntion that developers need to know.

Do something after page load successfully
$(document).ready(function() {
  //do something
});

Select Element by id / class
var element = $("#idOfElement");
var elementByClass = $(".className");

if have more than one element with same class name

var elementByClass = $(".className")[0];

Get selected value (drop down)

var selectedValue = $("#isDropdown").val(); //return selected value

Or

var selectedValue = $("#isDropdown option:selected").val(); //return selected value

Get selected text(drop down)

var selectedValue = $("#isDropdown").text(); //return selected text

Or

var selectedValue = $("#isDropdown option:selected").text(); //return selected text

Get Textbox Value

var valueTextBox = $("#idTextbox).val();
 
Show/hide element

 $("#idElement).show(); or  $("#idElement).fadeIn(500);
 $("#idElement).hide(); or  $("#idElement).fadeOut(500);

Add text/value inside div(innerHTML)

 $("#idElement).html("your value here");

Add event to form element

$("#idElement").change(function(e){
//do something if dropdown list change
});
refer complete event jQuery Event

Prevent form from submit

e.preventDefault();     or    e.stopImmediatePropagation();

Add class to element

$("#idElement").addClass("class name here");

Add style css to element

$("#idElement").css("display","block");

Add attribute to element

$("#idElement").attr("title","value title");

Submit form

$(#formID").submit();

Click Button

$('#ButtonID').click();

Select emenet from its attribute
html exaample :
<label>
    <input type="radio" name="newsletter" value="Hot Fuzz">
    <span>name?</span>
  </label>
jquery selector
$( "input[value='Hot Fuzz']" ).next().text( "Hot Fuzz" );

Add Blank option to top of DropDownList

$("#DropDownListID").prepend("<option value='' selected='selected'></option>");

Note : This is a basic function in that beginner need to know. Let me know if i miss something very important.

jQuery API Documentation
 

By
NOTE : – If You have Found this post Helpful, I will appreciate if you can Share it on Facebook, Twitter and Other Social Media Sites. Thanks =)
Read More...

Iguazu Falls - Amazing Waterfalls

Leave a Comment
This is a Iguazu  Falls are waterfalls of the Uguazu River on the border of the Brazil.


By
NOTE : – If You have Found this post Helpful, I will appreciate if you can Share it on Facebook, Twitter and Other Social Media Sites. Thanks =)
Read More...

How to remove previous append value JQuery

Leave a Comment
From my previous post to append dropdownlist value using jQuery .If you follow the step by step. The code actually work. But what will happen if the previous value are not remove and the first dropdown keep changed. The second dropdown value will keep increasing without remove the append  value.

Here is my solution to remove the previous append value to the dropdownlist.

<script type="text/javascript">
        $(document).ready(function () {
            
            var counter1 = 0;
            $("#dropdownCountry").change(function (e) {
                var obj1 = { Country: $("#dropdownCountry").val() };
                var isRemove1 = false;
                $.ajax({
                    type: "POST",
                    contentType: "application/json; charset=utf-8",
                    url: "http://localhost:3323/AjaxWebService.asmx/getState",
                    data: JSON.stringify(obj1),
                    dataType: "json",
                    success: function (data1) {
                        var appenddata1 = "";
                        var jsonData1 = JSON.parse(data1.d);
                        if (counter1 == 0)
                            counter1 = jsonData1.length;
                        else {
                            isRemove1 = true;
                        }
                        for (var i = 0; i < jsonData1.length; i++) {
                            appenddata1 += "<option id=\"appendDataTemp1\" value = '" + jsonData1[i].SHORT_NAME + " '>" + jsonData1[i].FULL_NAME + " </option>";
                        }
                        if (isRemove1) {
                            for (var j = 0; j < counter1; j++) {
                                $("#appendDataTemp1").remove();
                            }
                            counter1 = jsonData1.length; isRemove1 = false;
                        }
                        $("#dropdownState").append(appenddata1);
                    }
                });
            });
        });
    </script>

Note : please refer my previous post here to append dropdownlist value

By
NOTE : – If You have Found this post Helpful, I will appreciate if you can Share it on Facebook, Twitter and Other Social Media Sites. Thanks =)
Read More...

[SOLVED] JQuery - AJAX 500 Internal Server Error - JSON - jQueryAjax

Leave a Comment


The above error always occur if you work with jQuery + Ajax.

The error above may have several reason why the error occur and one of the reason is you are using the different parameter name to post to the server. Let say the method getState in webservice require one parameter which will represent country name, you must use the exactly name parameter to request from webservice.


The Other Reason

  1. Not using JSON.stringify to pass parameter value.
  2. If you not supply type in jQuery, it will use GET method which is not accept in your webservice configuration. Add  ( type : "POST ) in your jQuery code to use POST method.
  3. You are actually request data from different domain. Cross Domain Request (CORS)which is not allowed. Please read here
  4. Content type not supply or not correct. Use "application/json; charset=utf-8"
  5. DataType not not supply or not correct. Use json or jsonp

By
NOTE : – If You have Found this post Helpful, I will appreciate if you can Share it on Facebook, Twitter and Other Social Media Sites. Thanks =)
Read More...

How to append dropdownlist using jquery

Leave a Comment
If you want to create 2 dropdown list which the second dropdown value will depend on selected value from the first dropdown, you need to Implement JSON + Webservice+ JQuery .

In my solution i will create the JSON Webservice , and I will use Jquery Ajax to request data from webservice and append the value to the second dropdown.

Scenario

Let say the first dropdown will list all Country, and the second dropdown will list all state from selected country.

Solution

  1. Create JSON Webservice, you can refer to this link
  2. Create custom JQuery function to handle onChange event on dropdown list country.
  3. Bind return value from webservice to the second dropdown.

Full Code Example

Note : The webservice will use from the post here

<!DOCTYPE html PUBLIC "-//W3C//DTD XHTML 1.0 Transitional//EN" "http://www.w3.org/TR/xhtml1/DTD/xhtml1-transitional.dtd">
<html xmlns="http://www.w3.org/1999/xhtml">
<head>
    <title></title>
    <script type="text/javascript" src="Scripts/jquery-1.4.1.js"></script>
    <script type="text/javascript">
        $(document).ready(function () {
            //product item 1
            $("#dropdownCountry").change(function (e) {
                var obj1 = { Country: $("#dropdownCountry").val() };
                $.ajax({
                    type: "POST",
                    contentType: "application/json; charset=utf-8",
                    url: "http://localhost:3323/AjaxWebService.asmx/getState",
                    data: JSON.stringify(obj1),
                    dataType: "json",
                    success: function (data1) {
                        var appenddata1 = "";
                        //alert(data1.d);
                        var jsonData1 = JSON.parse(data1.d);
                        for (var i = 0; i < jsonData1.length; i++) {
                            appenddata1 += "<option value = '" + jsonData1[i].SHORT_NAME + " '>" + jsonData1[i].FULL_NAME + " </option>";
                        }
                        $("#dropdownState").append(appenddata1);
                    }
                });
            });
        });
    </script>
</head>
<body>
    <select id="dropdownCountry">
        <option>Select Country</option>
        <option>Malaysia</option>
    </select>

    <select id="dropdownState">
        <option>Select State</option>        
    </select>
</body>
</html>


By
NOTE : – If You have Found this post Helpful, I will appreciate if you can Share it on Facebook, Twitter and Other Social Media Sites. Thanks =)
Read More...

How to create JSON webservice in ASP.NET

Leave a Comment
This example will show how to create Webservice using asp.net and the result will return in format JSON(JavaScript Object Notation).

Below is the step by step to create webservice:

  1. Open Visual studio.
  2. Create New Project
  3. Add New File in the solution and choose Web Service file( .asmx)
  4. Copy paste code below to create your own JSON webservice

The Web Service Code

/// <summary>
    /// Summary description for KenticoJSONTest
    /// </summary>
    [WebService(Namespace = "http://tempuri.org/")]
    [WebServiceBinding(ConformsTo = WsiProfiles.BasicProfile1_1)]
    [System.ComponentModel.ToolboxItem(false)]
    // To allow this Web Service to be called from script, using ASP.NET AJAX, uncomment the following line. 
    [System.Web.Script.Services.ScriptService]
    public class AjaxWebService : System.Web.Services.WebService
    {

        [WebMethod]
        public string HelloWorld()
        {
            return "Hello World";
        }

        [WebMethod]
        [ScriptMethod(ResponseFormat = ResponseFormat.Json)]
        public String getState(string Country)
        {
            string retJSON = "";
            SqlConnection dbConn = new SqlConnection("<Connection String>");
            SqlDataAdapter dbAdapter = null;
            string sql = "SELECT STATE_FULL_NAME,STATE_SHORT_NAME FROM STATE WHERE COUNTRY LIKE '%" + Country + "%'";

            DataTable returnTable = new DataTable("State");
            dbConn.Open();
            dbAdapter = new SqlDataAdapter(sql, dbConn);
            dbAdapter.Fill(returnTable);
            dbConn.Close();

            retJSON = GetJson(returnTable);
            return retJSON;
        }


        private string GetJson(DataTable dt)
        {
            JavaScriptSerializer serializer = new JavaScriptSerializer();
            List<Dictionary<string, object>> rows =
              new List<Dictionary<string, object>>();
            Dictionary<string, object> row = null;

            foreach (DataRow dr in dt.Rows)
            {
                row = new Dictionary<string, object>();
                foreach (DataColumn col in dt.Columns)
                {
                    row.Add(col.ColumnName.Trim(), dr[col]);
                }
                rows.Add(row);
            }
            return serializer.Serialize(rows);
        }

    }

Example Output

"[{"FULL_NAME":"NEGERI SEMBILAN","SHORT_NAME":"N. SEMBILAN"},{"FULL_NAME":"WILAYAH PERSEKUTUAN KUALA LUMPUR","SHORT_NAME":"KUALA LUMPUR"},{"FULL_NAME":"MELAKA","SHORT_NAME":"MELAKA"}]"


By
NOTE : – If You have Found this post Helpful, I will appreciate if you can Share it on Facebook, Twitter and Other Social Media Sites. Thanks =)
Read More...

Sunday, 19 January 2014

JQuery Height not correct

Leave a Comment
JQuery have method to get the window height : - $(window).height()  , and document height : - $(document).height() ;

Problem

window height and document height give the same result which is wrong. If you resize the browser , the window height  should give smaller or bigger than document height.

The Full HTML Code

<html>
<head>
  <script type='text/javascript' src='http://code.jquery.com/jquery-1.10.1.js'></script>
  <script type='text/javascript'>$(document).ready(function(){
    $('#windowheight').text($(window).height());
    $('#documentheight').text($(document).height());
});

</script>
</head>
<body>
  <div id="result">
    $(window).height() = <span id="windowheight"></span> <br/>
    $(document).height() = <span id="documentheight"></span>
  </div>
<p>Lorem ipsum dolor sit amet, consectetur adipiscing elit.
 Sed vulputate faucibus orci sit amet iaculis. Etiam at libero mi.
 Cras aliquet leo in turpis sollicitudin, pellentesque tincidunt 
orci pellentesque. Aenean dictum lobortis aliquet. Nullam blandit 
rhoncus orci, posuere facilisis nibh placerat et. Etiam sed justo
 vel nisl molestie rutrum in eu ipsum. Etiam sed mattis erat, vitae
 malesuada metus. Nulla accumsan facilisis ligula, sit amet faucibus
 enim ullamcorper id. Praesent sodales dictum ipsum nec vehicula.


 In hac habitasse platea dictumst. Integer euismod ante euismod metus 
convallis consectetur. Aliquam id urna sit amet ligula tempor fermentum.
 Integer tincidunt elementum nunc, sit amet scelerisque enim iaculis a.
 Cras sed pharetra enim, sed bibendum massa. Aliquam laoreet elit ac placerat 
pellentesque.Pellentesque ullamcorper et lectus quis adipiscing.
 Phasellus fringilla diam augue, nec mattis ipsum porta ac. 
Nulla feugiat venenatis sapien, quis interdum nisi iaculis sit amet. 
Maecenas aliquet enim in arcu tincidunt, tincidunt porttitor arcu eleifend.
 Sed lobortis quam non purus interdum, eu lacinia lacus vehicula. 
Pellentesque et augue laoreet, mattis leo vel, congue enim. 
Ut fringilla erat vitae urna tincidunt porta. Curabitur scelerisque lorem
 id sagittis imperdiet.Ut convallis justo id urna congue ultrices. 
Integer placerat mollis sem, sit amet faucibus purus consectetur eget. 
Fusce porta pellentesque nisi id lacinia. Etiam bibendum tempus tortor, 
sit amet lobortis mi adipiscing vel. Curabitur feugiat, lacus nec ornare 
fermentum, velit leo pulvinar neque, eu fermentum eros orci a lectus. 
Quisque ligula erat, auctor lacinia neque id, aliquet eleifend magna. 
Aliquam iaculis placerat aliquet.Morbi a luctus nisl, commodo sagittis dolor.
 Proin sit amet libero quam. Fusce mattis egestas sapien, quis vulputate 
sapien commodo sed. Donec neque erat, feugiat nec quam nec, facilisis tempus leo.
 Vivamus auctor bibendum elit eu consequat. Mauris blandit est lectus, 
quis accumsan purus hendrerit a. Phasellus nec nisi in justo condimentum 
euismod. Pellentesque id arcu nunc. Phasellus in libero nec justo faucibus
 sollicitudin in eu massa. Vivamus faucibus purus libero, eu posuere orci 
tristique consectetur. Quisque urna sapien, sodales eget quam nec, sodales 
interdum felis. Vivamus dapibus justo eget augue malesuada, at laoreet nibh
 dapibus.Donec accumsan tellus dolor, in fermentum sem egestas non. Maecenas 
elementum eget metus eu consequat. Nulla vel ipsum non risus interdum consectetur.
 Phasellus convallis in leo rhoncus viverra. Mauris consectetur in diam et pretium.
 Etiam bibendum elit at iaculis cursus. Vestibulum ac ligula nec odio suscipit 
laoreet eu eget nisl. Quisque adipiscing nunc sed mi luctus faucibus. 
Ut quis nisi ac ipsum venenatis sodales. 
</body>
</html>

The Solution

HTML document doesn’t have DOCTYPE declaratio. So that the browser do not know what are the type of the document. So the solution is quite simple, just add <!DOCTYPE HTML> in the html file.

<!DOCTYPE HTML>
<html>

::

::

</html>


By
NOTE : – If You have Found this post Helpful, I will appreciate if you can Share it on Facebook, Twitter and Other Social Media Sites. Thanks =)
Read More...

Print GridView Header On Each Page While On Printing : ASP.NET

Leave a Comment
This example will show how you can include Table header on each page when you print the html document. You need to have the css, and javascript to do this objective. Let see the full example.

The ASPX Page

<!DOCTYPE html PUBLIC "-//W3C//DTD XHTML 1.0 Transitional//EN" "http://www.w3.org/TR/xhtml1/DTD/xhtml1-transitional.dtd">
<html xmlns="http://www.w3.org/1999/xhtml">
<head runat="server">
    <title></title>
    <style type="text/css" media="print">
        .hideOnPrint
        {
            display: none;
        }
    </style>
    <style type="text/css">
        @media print
        {
            th
            {
                color: black;
                background-color: white;
            }
            THEAD
            {
                display: table-header-group;
                border: solid 2px black;
            }
        }
    </style>
    <style type="text/css">        
        THEAD
        {
            display: table-header-group;
            border: solid 2px black;
        }
    </style>
</head>
<body onload="javascript:AddTHEAD('<%= GridView1.ClientID %>');">
    <form id="form1" runat="server">
    <div>
        <div class="hideOnPrint">
            <asp:Button ID="Button2" runat="server" OnClientClick="javascript:location.reload(true);window.print();"
                Text="Print" />
        </div>
        <asp:GridView ID="GridView1" runat="server" AutoGenerateColumns="False" BackColor="White"
            BorderColor="#999999" BorderStyle="Solid" BorderWidth="1px" CellPadding="3" ForeColor="Black"
            GridLines="Vertical" Font-Names="Arial" Font-Size="12px" OnRowCommand="ActionCommand">
            <Columns>
                <asp:BoundField DataField="ID" HeaderText="NO." />
                <asp:BoundField DataField="CustomerName" HeaderText="Customer Name" />
                <asp:ButtonField CommandName="showName" Text="Show Name" HeaderText="Show Name" ShowHeader="True" />
                <asp:ButtonField CommandName="EditName" Text="EditName" HeaderText="Edit Name" />
            </Columns>
            <FooterStyle BackColor="#CCCCCC" />
            <PagerStyle BackColor="#999999" ForeColor="Black" HorizontalAlign="Center" />
            <SelectedRowStyle BackColor="#000099" Font-Bold="True" ForeColor="White" />
            <HeaderStyle BackColor="Black" Font-Bold="True" ForeColor="White" />
            <AlternatingRowStyle BackColor="#CCCCCC" />
        </asp:GridView>
        <br />
        <asp:Literal ID="LClickName" runat="server"></asp:Literal><br />
    </div>
    <script type="text/javascript">
        function AddTHEAD(tableName) {
            var table = document.getElementById(tableName);
            if (table != null) {
                var head = document.createElement("THEAD");
                head.style.display = "table-header-group";
                head.appendChild(table.rows[0]);
                table.insertBefore(head, table.childNodes[0]);
            }
        }
        
    </script>
    </form>
</body>
</html>


The Code Behind

        protected void Page_Load(object sender, EventArgs e)
        {
            bindGV();
        }

        private void bindGV()
        {
            DataTable table = new DataTable();
            table.Columns.Add("ID", typeof(string));
            table.Columns.Add("CustomerName", typeof(string));

            for (int i = 0; i < 100; i++)
            {
                DataRow row = table.NewRow();
                row["ID"] = i.ToString();
                row["CustomerName"] = "customer Name: " + i.ToString();
                table.Rows.Add(row);
            }

            GridView1.DataSource = table;
            GridView1.DataBind();
        }

Output Example :


Page 1
Page 2
Page 3

Page 4


Note : The above solution already tested on Mozilla Firefox and IE only.


By
NOTE : – If You have Found this post Helpful, I will appreciate if you can Share it on Facebook, Twitter and Other Social Media Sites. Thanks =)
Read More...

Multiple select button in one gridview

Leave a Comment
GridView Multiple Select Buttons this is the keyword when i used to searching in Mr. Google and end up with several link to solve this problem. This was my solution to have a multiple select button in one GridView Controller

The ASPX Page

  <asp:GridView ID="GridView1" runat="server" AutoGenerateColumns="False" BackColor="White"
        BorderColor="#999999" BorderStyle="Solid" BorderWidth="1px" CellPadding="3" ForeColor="Black"
        GridLines="Vertical" Font-Names="Arial" Font-Size="12px" OnRowCommand="ActionCommand">
        <Columns>
            <asp:BoundField DataField="ID" HeaderText="NO." />
            <asp:BoundField DataField="CustomerName" HeaderText="Customer Name" />
            <asp:ButtonField CommandName="showName" Text="Show Name" />
            <asp:ButtonField CommandName="EditName" Text="EditName" />
        </Columns>
        <FooterStyle BackColor="#CCCCCC" />
        <PagerStyle BackColor="#999999" ForeColor="Black" HorizontalAlign="Center" />
        <SelectedRowStyle BackColor="#000099" Font-Bold="True" ForeColor="White" />
        <HeaderStyle BackColor="Black" Font-Bold="True" ForeColor="White" />
        <AlternatingRowStyle BackColor="#CCCCCC" />
    </asp:GridView><br />
    <asp:Literal ID="LClickName" runat="server"></asp:Literal><br />

The Code Behind

 protected void Page_Load(object sender, EventArgs e)
 {
       bindGV();
 }
 private void bindGV()
 {
       DataTable table = new DataTable();
       table.Columns.Add("ID", typeof(string));
       table.Columns.Add("CustomerName", typeof(string));
       for (int i = 0; i < 10; i++)
       {
           DataRow row = table.NewRow();
           row["ID"] = i.ToString();
           row["CustomerName"] = "customer Name: " + i.ToString();
           table.Rows.Add(row);
       }

       GridView1.DataSource = table;
       GridView1.DataBind();
  }
  protected void ActionCommand(object sender, GridViewCommandEventArgs e)
  {
      string commandName = e.CommandName.ToString().Trim();
      GridViewRow row = GridView1.Rows[Convert.ToInt32(e.CommandArgument)];
      switch (commandName)
      {
          case "showName":                    
              LClickName.Text = "You Clicked Show Name Button : \"" + row.Cells[1].Text + "\"";                    
              break;
          case "EditName":                    
              LClickName.Text = "You Clicked Edit Name Button : \"" + row.Cells[1].Text + "\"";                   
              break;
          default: break;
      }
   }

Output Example


Quite easy to determine which button is clicked for several select button when using CommandName. Now you actually can have more than one select button in one gridview


By
NOTE : – If You have Found this post Helpful, I will appreciate if you can Share it on Facebook, Twitter and Other Social Media Sites. Thanks =)
Read More...

C#: Check if an application is already running

Leave a Comment
This is the snippet code to check if application running or not in C#

using System.Diagnostics;
bool IsApplicationAlreadyRunning(string processName)
{ 
     Process[] processes = Process.GetProcessesByName(processName);
     if (processes.Length >= 1)
         return true;
     else
        return false;
}


By
NOTE : – If You have Found this post Helpful, I will appreciate if you can Share it on Facebook, Twitter and Other Social Media Sites. Thanks =)
Read More...

RegisterForEventValidation can only be called during Render()[SOLVED]

Leave a Comment
Today i do my routine by developing / testing / and debuggig and found error on my web page :

RegisterForEventValidation can only be called during Render();

The code actually for get html code from server side inside panel ...

 var sb = new StringBuilder();
 Panel1.RenderControl(new HtmlTextWriter(new StringWriter(sb)));
 string htmlToConvert = sb.ToString();

So i do some googling and found the causes of this error occur..

The Causes

occurs when you try to render a control to Response. Generally some people got this when I exported GridView to Excel, Word, PDF or CSV formats. The ASP.Net compiler issues the above Exception since it feels the Event is invalid.

Solution

The solution is quite simple you need to notify ASP.Net that not to validate the event by setting the EnableEventValidation flag to FALSE You can set it in the Web.Config in the following way

<pages enableEventValidation="false"></pages>

This will apply to all the pages in your website. Else you can also set it in the @Page Directive of the page on which you are experiencing the above error.

<%@ Page Title="" Language="C#" MasterPageFile="~/Site.Master" AutoEventWireup="true"
 EnableEventValidation="false"
    CodeBehind="PingInASPdotNet.aspx.cs" Inherits="BlogExample.PingInASPdotNet" %>

The above solution helped me solved my issue.Please share if you have better solution than this. Thanks.


By
NOTE : – If You have Found this post Helpful, I will appreciate if you can Share it on Facebook, Twitter and Other Social Media Sites. Thanks =)
Read More...

C# coalesce operator : Question Mark In C# and Double Question Mark

Leave a Comment
A not so common, but very useful operator is the double question mark operator (??). This can be very useful while working with null able types.
Lets say you have two nullable int:

int? numOne = null;
int? numTwo = 23;

Note : int? (data type with question mark used to declare variable with null able type)

Scenario: If numOne has a value, you want it, if not you want the value from numTwo, and if both are null you want the number ten (10).

Old solution:

if (numOne != null)
    return numOne;
if (numTwo != null)
    return numTwo;
return 10;

Or another solution with a single question mark:

return (numOne != null ? numOne : (numTwo != null ? numTwo : 10));

But with the double question mark operator we can do this:

return ((numOne ?? numTwo) ?? 10);

Output : return numOne if have value, else return numTwo else return 10;
As you can see, the double question mark operator returns the first value that is not null.

By
NOTE : – If You have Found this post Helpful, I will appreciate if you can Share it on Facebook, Twitter and Other Social Media Sites. Thanks =)
Read More...

Friday, 17 January 2014

Pinging in ASP.NET Example

Leave a Comment
This tutorial will show you how to ping a hostname/ip using the .NET System.Net class, ASP.NET 2.0 and C#.NET. The .NET Framework offers a number of types that makes accessing resources on the network easy to use. To perform a simple ping, we will need to use the System.Net, System.Net.Network.Information, System.Text namespaces.

using System.Net;
using System.Net.NetworkInformation;
using System.Text;

ASPX Page

 <asp:ScriptManager ID="ScriptManager1" runat="server">
    </asp:ScriptManager>
    <asp:UpdatePanel ID="UpdatePanel1" runat="server">
        <ContentTemplate>
            <table width="600" border="0" align="center" cellpadding="5" cellspacing="1" bgcolor="#cccccc">
                <tr>
                    <td width="100" align="right" bgcolor="#eeeeee" class="header1">
                        Hostname/IP:
                    </td>
                    <td align="center" bgcolor="#FFFFFF">
                        <asp:TextBox ID="txtHost" runat="server"></asp:TextBox>
                        &nbsp;&nbsp;
                        <asp:Button ID="btnSubmit" runat="server" OnClick="btnSubmit_Click" Text="Submit" />
                    </td>
                </tr>
                <tr>
                    <td width="100" align="right" bgcolor="#eeeeee" class="header1">
                        Ping Results:
                    </td>
                    <td align="center" bgcolor="#FFFFFF">
                        <asp:TextBox ID="txtPing" runat="server" Height="400px" TextMode="MultiLine" Width="400px"></asp:TextBox>&nbsp;<br />
                        <asp:Label ID="lblStatus" runat="server"></asp:Label>
                    </td>
                </tr>
            </table>
            <asp:Timer ID="Timer1" runat="server" Interval="4000" OnTick="Timer1_Tick">
            </asp:Timer>
        </ContentTemplate>
    </asp:UpdatePanel>


Code Behind

protected void Page_Load(object sender, EventArgs e)
        {

        }
        protected void btnSubmit_Click(object sender, EventArgs e)
        {
            try
            {
                lblStatus.Text = "";
                sendSubmit();
            }
            catch (Exception err)
            {
                lblStatus.Text = err.Message;
            }
        }

        protected void Timer1_Tick(object sender, EventArgs e)
        {
            if(txtHost.Text != "")
                sendSubmit();
        }

        public void sendSubmit()
        {
            Ping ping = new Ping();
            PingReply pingreply = ping.Send(txtHost.Text);
            txtPing.Text += "\r\nAddress: " + pingreply.Address + "\r\n";
            txtPing.Text += "Roundtrip Time: " + pingreply.RoundtripTime + "\r\n";
            txtPing.Text += "TTL (Time To Live): " + pingreply.Options.Ttl + "\r\n";
            txtPing.Text += "Buffer Size: " + pingreply.Buffer.Length.ToString() + "\r\n";
        }

Output Example


By
NOTE : – If You have Found this post Helpful, I will appreciate if you can Share it on Facebook, Twitter and Other Social Media Sites. Thanks =)
Read More...

Dynamically Add/Remove rows in HTML table using JavaScript

Leave a Comment
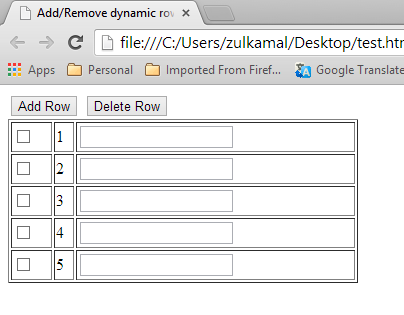
This is very often for web developer when we need to use dynamically generate HTML table using JavaScript. The example will spare the first row(cannot delete) and you can dynamically add new row by clicking the button Add Row or delete the row by clicking the button Delete Row.

The Code

<!DOCTYPE html PUBLIC "-//W3C//DTD XHTML 1.0 Transitional//EN" "http://www.w3.org/TR/xhtml1/DTD/xhtml1-transitional.dtd">
<html xmlns="http://www.w3.org/1999/xhtml">
<head>
    <title>Add/Remove dynamic rows in HTML table </title>
    <script language="javascript">    
        function addRow(tableID) {
            var table = document.getElementById(tableID);
            var rowCount = table.rows.length;
            var row = table.insertRow(rowCount);
            var cell1 = row.insertCell(0);
            var element1 = document.createElement("input");
            element1.type = "checkbox";
            cell1.appendChild(element1);
            var cell2 = row.insertCell(1);
            cell2.innerHTML = rowCount + 1;
            var cell3 = row.insertCell(2);
            var element2 = document.createElement("input");
            element2.type = "text";
            cell3.appendChild(element2);
        }

        function deleteRow(tableID) {
            try {
                var table = document.getElementById(tableID);
                var rowCount = table.rows.length;
                for (var i = 0; i < rowCount; i++) {
                    var row = table.rows[i];
                    var chkbox = row.cells[0].childNodes[0];
                    if (null != chkbox && true == chkbox.checked) {   
                       table.deleteRow(i);
                        rowCount--;
                        i--;
                    }
                }
            }
            catch (e) {
                alert(e);
            }
        }

    </script>
</head>
<body>
    <input type="button" value="Add Row" onclick="addRow('dataTable')" />
    <input type="button" value="Delete Row" onclick="deleteRow('dataTable')" />
    <table id="dataTable" width="350px" border="1">
        <tr>
            <td>
                <input type="checkbox" name="chk" />
            </td>
            <td>
                1
            </td>
            <td>
                <input type="text" />
            </td>
        </tr>
    </table>
</body>
</html>

Output Example


Read More...

Subscribe to our newsletter to get the latest updates to your inbox.

Your email address is safe with us!


Founder of developersnote.com, love programming and help others people. Work as Software Developer. Graduated from UiTM and continue study in Software Engineering at UTMSpace. Follow him on Twitter , or Facebook or .


Powered by Blogger.